The Development System
In general, a computer development system is one that is used to write, execute, debug, and deploy computer programs. Our development system is comprised of the following components:
- A personal computer (PC) (e.g., one running the Windows, macOS, or Linux operating system)
- The Anaconda distribution of the Python 3 software
- The Spyder integrated development environment (IDE)
An IDE is a software application in which a programmer can write, execute, and debug their programs.
On your PC, set up your development system with the following steps:
- Download the Anaconda distribution of the Python software from the
following URL:
www.anaconda.com/download
Open the installer and follow the instructions for installation. - Download and install the Spyder IDE from the following URL:
www.spyder-ide.org
Open the installer and follow the instructions for installation.
The Anaconda Distribution of Python
Anaconda provides a way of managing multiple Python environments; a Python environment is a specific version of Python with a set of packages. For a given project, it is best practice to maintain a separate environment; this allows us to specify a Python version and set of packages required to run the programs in the project. Anaconda provides a framework in which we can create an environment, called a conda environment.
We will creat our own environment in the next section.
Hello World and the Spyder IDE
When it is first loaded, the Spyder IDE looks something like what is shown in fig. ¿fig:spyder0?.
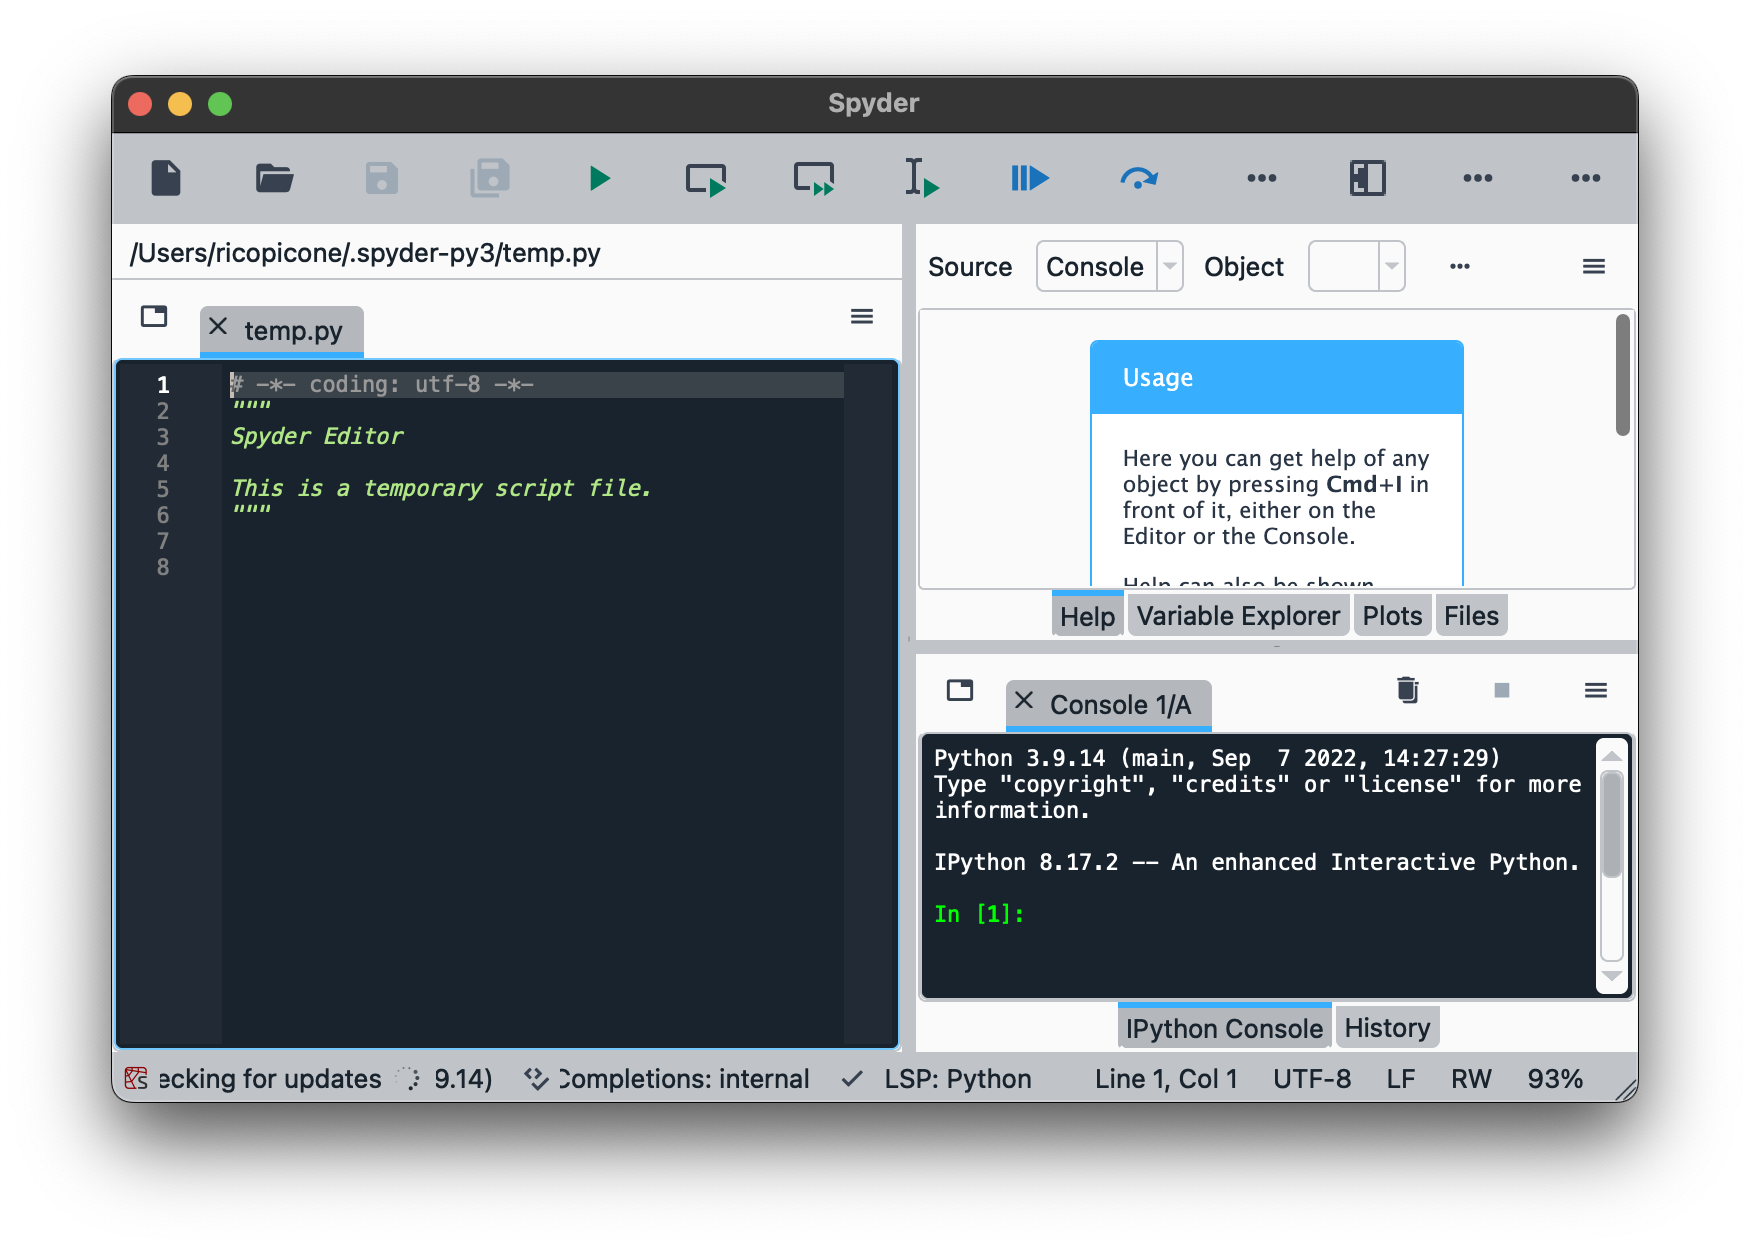
The left pane is the code editor. It has a default Python file, which conventionally has extension
.py, already queued up. Create a new
Python file by selecting the menu item . Save this file () as hello_world.py in a dedicated directory.1
The hello_world.py file already contains a triple-quoted string with basic information about the file. Below the ending quotes, add the following statement:
print("Hello World!")Save the file and run it with the menu selection or the key F5.
The console pane on the lower right shows the result of the execution of the file, which is the output
Hello World!Now let’s edit the program as follows:
greeting = "Hello World!"
print(greeting)
This should yield the same result in the console. In the upper-right pane, select the tab. This shows variable names, types, and values in the current kernel. A kernel is a computing process that runs programs. In most environments, when a program runs, a kernel is created at the start and destroyed at the end of execution. However, Spyder maintains the same kernel between runs. This is convenient for debugging purposes. For instance, we can interact with the program(s) run in the current kernel by entering commands in the console; try entering
greeting This will return the value of the variable greeting. The console is a convenient
place to try out statements as we work on our program. For instance, we
may want to append some text to the greeting string. In the console,
try
greeting + "It's a beautiful day" This returns, Hello World!It's a beautiful day, which is
close but not quite what we wanted. We should add a space character to
the beginning of our addendum. So, trying it out in the console allowed
us to quickly debug our code.
The persistent kernel can also cause problems. Sometimes we may want to create a new kernel by selecting the menu item , which clears all variables and unloads any packages. Similarly, to clear all variables in the kernel, we can execute the console magic command
%reset We will be asked to confirm, which we can do by entering y.
Configuring the Spyder IDE for Anaconda
In subsection 1.4.3, we used the Python
distribution that Spyder has built in. We here configure Spyder to use
the Anaconda distribution installed in subsection
1.4.1. First, we must install the spyder-kernels package in the base Anaconda environment. On a Windows PC,
open the Anaconda Prompt application; on MacOS or Linux, open the
Terminal application. To ensure you have activated the base environment, enter the following
prompt:
conda activate baseNow install the spyder-kernels
package with the command
conda install spyder-kernels Enter y if prompted. After
successful installation, conda list should
display the packages installed in the base environment, including spyder-kernels. Finally, enter the command
which pythonCopy or record the returned path.
In Spyder, open preferences with Ctrl+,.
Navigate to the tab and check . Either paste the path copied
above in the text field or click the button, then
navigate to the path in question, selecting the python program. Click to complete the
configuration.
You may need to restart Spyder for the changes to take effect.
The Development System
In general, a computer development system is one that is used to write, execute, debug, and deploy computer programs. Our development system is comprised of the following components:
- A personal computer (PC) (e.g., one running the Windows, macOS, or Linux operating system)
- The Anaconda distribution of the Python 3 software
- The VS Code integrated development environment (IDE)
An IDE is a software application in which a programmer can write, execute, and debug their programs.
On your PC, set up your development system with the following steps:
- Download the Anaconda distribution of the Python software from the
following URL:
www.anaconda.com/download
Open the installer and follow the instructions for installation. - Download and install the VS Code IDE from the following URL:
https://code.visualstudio.com
Open the installer and follow the instructions for installation.
The Anaconda Distribution of Python
Anaconda provides a way of managing multiple Python environments; a Python environment is a specific version of Python with a set of packages. For a given project, it is best practice to maintain a separate environment; this allows us to specify a Python version and set of packages required to run the programs in the project. Anaconda provides a framework in which we can create an environment, called a conda environment.
Configuring VS Code with Anaconda
To configure VS Code to use the Anaconda distribution of Python, follow these steps:
- Install the Python and Jupyter extensions
-
After installing VS Code, open the application. Choose the menu item and install the Python extension by Microsoft. This extension provides Python language support, debugging, and additional tools for Python programming. Also install the Jupyter extension, which provides notebook support in VS Code.
- Open a working directory
-
Open a directory in which to save your Python programs by selecting the menu item . Navigate to a convenient location and create a new directory, such as engineering_computing. Select this directory and click . You will save your Python programs in subdirectories of this directory.
- Create a conda environment
-
Open a terminal in VS Code by selecting the menu item . In the terminal, enter the following command to create a new conda environment named
ec:conda create --name ec python=3.12 jupyter numpy matplotlib sympyThe
python=3.12argument specifies the Python version, and the packagesjupyter,numpy,matplotlib, andsympyare installed in the environment. - Select the Python interpreter
-
Open the Command Palette by selecting the menu item . Type
Python: Select Interpreterand select the corresponding command that appears. Select the Python interpreter that corresponds to theecenvironment of Anaconda created in the previous step. This will allow VS Code to use the Anaconda distribution of Python, and this interpreter will be used for all Python programs in the open directory (i.e., you will not need to select the interpreter for each program).
Hello World and VS Code
Create a new Python file by selecting the menu item . Save this file () as hello_world.py in a dedicated directory.2
Add the following statement:
print("Hello World!")Save the file and run it with the menu selection or the key F5.
A new terminal will open in the lower pane of the VS Code window and displayed will be the output
Hello World!Now let’s edit the program as follows:
greeting = "Hello World!"
print(greeting)
This should yield the same result in the terminal. Now right-click anywhere in the editor pane and select . This will open an interactive window that will execute the program and display the output. This is different from the terminal in that it allows us to interact with the program after it has run.
In the interactive window, select the button. This shows variable names, types, and values in the current kernel. A kernel is a computing process that runs programs. In most environments, when a program runs, a kernel is created at the start and destroyed at the end of execution. However, the interactive window maintains the same kernel between runs. This is convenient for debugging purposes.
A prompt appears at the bottom of the interactive window, where we can enter Python commands that are executed in the context of the program that was run. For instance, we can interact with the program(s) run in the current kernel by entering commands in the prompt; try entering
greeting This will return the value of the variable greeting. The console is a convenient
place to try out statements as we work on our program. For instance, we
may want to append some text to the greeting string. In the console,
try
greeting + "It's a beautiful day" This returns, Hello World!It's a beautiful day, which is
close but not quite what we wanted. We should add a space character to
the beginning of our addendum. So, trying it out in the console allowed
us to quickly debug our code.
The persistent kernel can also cause problems. Sometimes we may want to create a new kernel by clicking the button , which clears all variables and unloads any packages. Similarly, to clear all variables in the kernel, we can execute the magic command
%reset We will be asked to confirm, which we can do by entering y. Note that magic commands like this are only
available in the interactive window, and cannot be used in Python
programs. The interactive window is a great place to test out code
snippets and debug programs. It is, in fact, a form of a Jupyter notebook, which is a powerful tool for
data analysis and visualization. See appendix A for
more information on Jupyter notebooks.
In programming, file names should not include spaces, periods (other than for the extension), or most special characters. As a word separator, the hyphen
-is usually fine, but the underscore_is typically safer. For Python files, the underscore is preferable.↩︎In programming, file names should not include spaces, periods (other than for the extension), or most special characters. As a word separator, the hyphen
-is usually fine, but the underscore_is typically safer. For Python files, the underscore is preferable.↩︎
Online Resources for Section 1.4
No online resources.